Soaking My Feet

Every time I use my foot bath (which I’ve had for about 10 years, I ask myself why I don’t do it more often.

Every.

Time.

It is a simple act that feels incredibly indulgent. I don’t pay much attention to my feet, unless it is to paint my toenails, which I don’t do very often either, it seems.

Beyond enjoying the warm water, bubbles and massage, the delicious aromas of essential oils wafting around the room – I enjoy the fact that I’m saving a good $40 on a pedicure. I know many people would look at it otherwise, willing to spend the money and have someone else do it, which I do – about once a year. Every other time, I’m satisfied with my home experience, knowing I’m saving money on something I can do nearly as good.

And I don’t have to shave my legs before I do it at home.

(Not really) sorry to say, but my razor gets way less action in the winter months. This used to concern me more when I was about 20. I’m staring 40 in the eyes and it bothers me very little to admit that. Less than it did when I was 30. So the fact that I get to sit on my couch, update my blog, wear my sweats over my non-shaven legs… works for me.


Snicker Salad

This is a ridiculously easy salad to make. We had a wrestling banquet (potluck) going on an I was short on time. I was busy making the team DVD (which I procrastinated on), and needed something quick, easy, and yummy. I’ve only made this salad a few times (because it is sinfully good, and too easy to munch on hourly), but it was always a hit. I first had it at my girlfriend Jodi’s house. My kids loved it and asked for it occasionally when they would remember it. It just… isn’t something that I want to put into our rotation of foods. This “salad” needs to be taken to a potluck to share.


(image courtesy of Flickr – mamaslittlemonkeys)

There are variations to this, but for the most part it calls for (ready?):
apples, whipped topping, snickers

Easy, eh?

Here’s how I broke it down:

SNICKER SALAD

Ingredients
3 tart Granny Smith
3 red apples (just not Red Delicious – something else – I think we used Pink Lady)
1 cup red grapes (you don’t need these, I just added them)
9 regular size Snicker bars (they cut easier if they are cooler)
Large tub of Cool Whip

Directions
Wash apples; chop into bite-sized chunks (skin-on). Toss in a big bowl. Add container of whipped topping  and toss to coat. (I did this to keep them from browning). Chop 4 of the Snickers into bite-sized pieces; mix/fold into salad. Wash grapes; cut in half, and add to salad. Mix again. Chop 4 of the Snickers, add to salad and mix. Transfer to pretty bowl. Chop remaining bar, sprinkle on top of salad. Remove from home via transfer to whatever gathering you are attending. Prepare to bring home an empty bowl.

Savoring

I’d love to take a photography class. A few years ago I purchased a Nikon D3000 and a lens, pooling both mine and Frank’s birthday money together. He was OK with it, don’t worry. Though I’m very happy with the pictures I can take, I know I could get better pictures with more consistency if I knew more about my camera’s settings. It is Dante’s senior year of high school and, of course, I’d like to get some decent shots of him in his final high school games. Thankfully when the season started it was light out longer and I’ve been able to get a few pictures. But the shots under the stadium lights are, for the most part, blurry. The only good ones are still shots, like below.

Nothing going on, all after the play because the real shots, the ones I wanted and took prior to this one are all blurred.

This is where I kick myself for wanting and wishing and not DOING. I need to be more on the action side of things. Less wanting and wishing, more accomplishing.

It has been a joy watching him play and grow. Starting as a freshmen on varsity with nervous energy and anticipation. Over the years he’s forgotten his jersey, struggled balancing academics and athletics, had to warm the bench a few times for different (tame) reasons, forgotten a brand new pair of $200 cleats at a tournament (that was a fun one – we never saw those cleats again), scored an amazing goal against a team we “just don’t score against,” the list goes on. Now, finishing off as a senior, unsure if he was even going to play soccer this year. Senior year is all about decisions, you know. Too many of them, really.

I can’t believe it has actually been that long, four years, and that we are really at this point, but there it is. I’m thankful that we put our money into that camera. It has followed us on vacations, celebrations, holidays, around the house, and to many sporting events, capturing moments of time for us to remember them a little more clearly as our brains become foggier. With five kids steamrolling through the teenage years, it is easy to “get through each day,” anticipating the squares heavily scheduled on the calendar, wondering how we will manage them. Once we accomplish the day, and it is behind us — onto the next adventure! Those days are like putting pizza in a blender and sucking it through a straw. Everything is blurry, jumbled, and easily forgotten fairly soon after.

Slow it down, carve a memory in the mind. Savor, don’t snarf. Enjoy each bite. Even if everything surrounding that moment is blurry. Clarity amongst the chaos. 

Making Crockpot Yogurt Second Attempt

This time, it worked.

Thick(er) than my first attempt, but not quite as thick as store-bought. I tried to keep the concoction warmer this time. When I removed some warmed milk to mix with the yogurt, and returned the mixture, I turned on the crock to HIGH for a bit, stirred, set the oven to WARM for about 10 minutes or so, and then removed the warm pot from the crock, wrapped it in a towel, placed in the oven (which I had turned off) with the light on, and left it to sleep all night long.

I dug in, and it didn’t feel like cold milk.

This recipe makes a LOT of yogurt. I’m not sure what part of me didn’t consider that. I suspect determination to make it overrode common sense. Thankfully, I had some glass jars in the ready, as well as a few plastic containers for individual servings.

Glass jar was first. I figured it would hold a couple of cups worth and decided to go for maple.

Read more

Housecleaning aka Blogcleaning

For the longest time I’ve wanted to change my blog template, update it to use some of the more recent functionality that WordPress has to offer. I searched high and low for a (free) 3-column template. The only ones I found that I really liked were not free. That was a struggle. I didn’t bend, though, and after a year or so of patience, I settled on a different template.

It feels good. The internet has been somewhat of an oppression for me. I have work that I do online (freelance), work that I do online for my job, and fun time. The lines were blurred too much, and what was fun became work. I’d like for it to be fun again. No oppressing.

My life has gone out of control. I have more than I can manage and I need to re-prioritize. Some of the tasks that I’ve taken on I don’t do to my satisfaction because I have too much on my plate. And I’m starting to get a bit selfish. I don’t know if that is good, bad, normal at this stage in my life– I really don’t know. I just want to do a decent job at a few things, and not a patchy job at many. I feel I’m at the latter end, and it doesn’t settle well with me. It is OK; I’m glad I’m able to recognize it. I see some natural shifting of my responsibilities, and that will change my workload. I still need to take a look at where I am spending my time.

I also need to clean my house. Once in a while (a cycle? I don’t know) I will get ornery and mean. Bite a head off if it comes near my teeth, chomp on an arm if it brushes by. Part of that is dissatisfaction, flat out discomfort with my home. If the house feels icky, the world feels icky. To me. If I could take a month off of everything and deep clean my house, I surely would. I’d love to. But it would take that long, really. Not to fix everything. There’s not enough time and money to do that. But to clean it up, toss what I don’t use or need and better organize what is useful, scour, scrub, and patch what I can? Goodness.

I would feel more comfortable in my home then, though. So, really, it is priority to do something about it. Tackle more here and there. Replace time and energy that is being spent on a task less meaningful and channel it to where it would improve my day-to-day.


Homemade Deodorant Trial

There is a ton of information on the web regarding trying homemade deodorant. Here is my experience with it.

Why try homemade deodorant?

Because I’ve struggled for years to find the “right” deodorant. Because I’ve tried “natural” ones and they never made the cut. Because I don’t like the idea of slathering chemicals on my skin constantly. Because I am a product slut. Recovering, that is.

Armpit Profile

Commonly used: Dove, Secret, Arm & Hammer, Sure. Tried Tom’s; gave me itchy rash. Tried it again; same thing.

Sweaty, but not overly sweaty.

Concerned with odor, but it hasn’t cramped my lifestyle.

Shave? Occasionally. Winters, rarely. My pits are sensitive and I’m not a priss about having clean-shaven pits.

Homemade Deodorant Recipe Used

This is the recipe I started with. It is a common-found recipe on the internet. Search long and hard and you’ll find all kinds of variations and recommendations.

5 Tbsp. coconut oil
1/4 c. cornstarch (alternative – arrowroot powder)
1/4 c. baking soda
Optional: Essential oils. I couldn’t quite tell you the percentages because it was not precise.

The CCO (coconut oil) has a low melting point, so if you make this in summer, you might not have to even put it in the microwave. I made it after the temperature in my house was above the melting point, so I needed to put in in the microwave, briefly.

Homemade Deodorant

I stored mine in a small lotion container after frantically searching for something, anything to keep it in.

Homemade Deodorant

Findings

Read more

Coldwashing Laundry

Day 8 of Nabloplomonoinon-whatever it is.

I’m enjoying the challenge (and reminder) to blog daily. But it is a chore, only because of my scatterbrained lifestyle.

Today I accomplished a lot, while seemingly accomplishing nothing. I don’t know how that works out, but I just know it makes sense to me. Although I did do load after load of laundry. I used my Tide Coldwater detergent. Have you used that? I wasn’t sure if it was all hype, or worth the extra money (less loads in same size bottle), but I felt compelled to give it a try. A girlfriend of mine uses it pretty much exclusively. I noticed that after going to her house a few times and only seeing 1 bottle of detergent: Tide Coldwater. I didn’t say anything to her about it. In fact, I felt like a weird-o snooping around her laundry room. Instead of asking, I just noted it in my head. And then told myself that I was trying it.

I read up on it one day, spending way too much time googling, and far less doing. Story of my life. Finally, though, I threw a load in. It seems to work just fine. I have no complaints and don’t notice a difference between my warm-water washing, and my washing with the TCW in cool/cold or cold/cold. I don’t wash the towels or underwear in it, though. Something about coldwashing those items doesn’t seem… right to me. I didn’t use it for my whites, either, because those I do wash in hotter water.

I really shouldn’t have such a wacky system for doing laundry, mirroring the same indecisiveness as other areas in my life. But I take my laundry seriously and have particular ways of doing it. I can get into that another time, though. Today I got to talking about the TCW – or is it CWT? Who knows. Or cares. If you’ve been to a store, you probably know what I’m talking about, and since I’m tired, we’ll just leave things as they are.

So today I washed some darks in some TCW and hung them out to dry. Beautiful, 60-degree Wisconsin weather in November. I couldn’t ask for much more, save for a bit more wind to dry my stuff faster. But I won’t complain. I did loads of blankets. Having the windows closed for a while now makes everything feel stuffy. I wish I could take all fabric items from my house, put them in a humongous washing contraption and hang them all out to dry, carpets included.

Line-hanging brings the freshness of outdoors in; I really do love it. My TCW-washed clothes and blankets smell and look fresh and clean. Bottom line, though, I don’t think I’ll be making TCW one of my staples. The jury is still out, since I haven’t really given coldwashing much of a try prior to picking up the TCW. Stay tuned.

Using Scissors to Save Money Around the House

Save money using something you already have — a pair of scissors!!

What?! You say?

Yes. Below are five simple household items you can take a scissors to to help you save money.

1.) Sponges. Take your regular sponge or green scrubbie at the kitchen sink and chop it in half, turning your 3-pack into a 6-pack, doubling your money. Half a sponge lasts and cleans just as well as a whole one. Really.

2.) Hair. OK. That’s an easy. But, if you have four boys like I do, you can save yourself $75  each time you’d visit the barber by cutting their hair at home by yourself. I did this for years. Now my husband shaves his head, and half the time the boys get a cut once a year, letting it grow out the rest of the time. That’ll save ya money, too.

3.) Old towels. Out with the old, in with the new – well don’tcha dare throw away those old bath towels until you’ve ragged them up. You heard me. Rag’em up!! You can get a good 12 rags out of 1 bath towel. Store these under your sink (or wherever you keep your cleaning supplies).

My biggie is cleaning the toilet. Between cutting up towels or junked clothes, I’m usually stocked with throw-away rags. If I’m out of rags, I use paper towels. I just can’t get down with using something that is not disposable, because toilets are plain grodie – you feel me? It doesn’t seem clean to me unless I throw out whatever I used to clean the stinky critter.

rags

4.) Dryer sheets. If you really want to save money on those sheets, cut them in half. This is hard for some people, because some of ya’ll actually use TWO sheets per load. So I understand cutting down to a half of one might not be your thing. But if you’re not a dryer sheet lover, then you really CAN go down to half a sheet. Try it.

5.) Your yard. Yuppers. You heard me right – cut your grass with scissors. Better yet, get the kids to do it, if you have them. Believe me, an entire day of hands-and-knees grass cutting will wear your kids OUT. Free, non-polluting and so easy a child can do it. Can’t ask for more.

I’m KIDDING. Pick your jaw up off the floor. OK. Here’s number five for serious.

5.) Houseplants. Yes, houseplants. They’re called “stem cuttings.” You can fill your entire home with houseplants by employing a little patience and a few generous friends (or a mom, in my case) who won’t care if you take a scissors to their plants.

Basically you cut a few 6-inch stems off of the established potted plant, take off the lower leaves and plunk the cuttings into an bottle/jar of water for a while until the roots grow, then plant them in a pot. It isn’t rocket science. For a black thumb like me, it also isn’t a huge comittment. If it works out, great – if not, not a biggie. HGTV has some easy but more expanded instructions on reproducing houseplants from stem cuttings, if you are so inclined.

There you have it. Five super easy ways to save money around the home using a pair of scissors (and I didn’t use “coupons” as one of the examples). Do you have anything you use scissors on to save money? Let me know, I’d love to hear it.

Cold-Brew Coffee Concentrate (Homemade)

In 2006 I wrote about a Cold-Brew coffee concentrate that you could easily make at home. After switching over to WordPress, it got buried. But it is one that is worth re-visiting…

After reading a magazine about cold-brew coffee, I thought it would be an interesting project to try. The article boasted of a less-acidic/bitter brew, yet still strong and tasty – but noticeably smoother. With a multiple batches under my belt, now, I am ready to share some information.

I knew there was an appliance (called the Toddy Maker Cold Brew Coffee Maker) that I could purchase to make the coffee, but decided to take a more rustic approach. If I can accomplish a decent cold-brew coffee without spending any money or cluttering up my house with yet another appliance – I’d be a happier woman.

coldbrewcoffee.jpg There’s instructions out there, most conflicting. Here you will find instructions to how I made cold-brew coffee with success.

COLD-BREW COFFEE INSTRUCTIONS

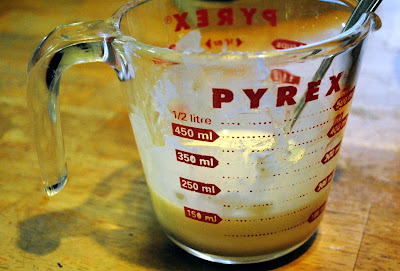
I put coffee grounds (nothing special – store bought ground OR your favorite whole bean [set your grind to percolator]) into a glass measuring cup. The ratio I used was 3:1, water:coffee. (You can simplify by doing 1 pot-worth of grounds to 16 oz. water, if you’d like.) I stir mine, though others will say not to. I don’t see how letting dry coffee sit on top of water is going to do anything for you, hence my decision to stir the mixture, making sure all the grounds get wet.

After stirring the mixture, I covered it and placed the container into the fridge for minimum 12 hours.

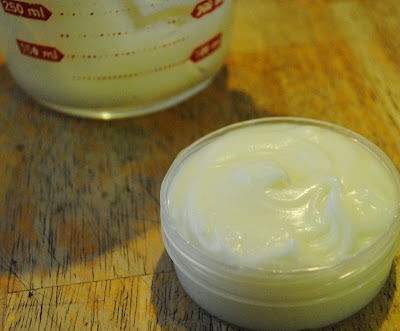
After the waiting period, I give it one more stir; filter it to get rid of the grounds. (I use a mesh tea-strainer to filter the grounds out. I’ve also had success with first filtering through with a veggie colander, and then using the mesh filter.)

To prepare the coffee I used a similar ratio, but that will depend on your own tastes. I put the concentrate in my mug, and put some fresh water on the stove to warm. I didn’t heat it to boiling, but to the point where steam is escaping. Poured this over my concentrate.

That’s it. Very simple. Generally used 1 cup coffee to 3 cups water and it makes enough concentrate for a day or two. Obviously depending on your ratio of concentrate, you will need more or less to make your coffee. The more times you do it, the better you will be able to make the mixture to suit your own preferences. You can store this in the fridge for up to a week.

Bottom Line:
I really like cold-brewed coffee. It is a simplified, less wasteful way to make coffee (I don’t like coffee that has been sitting on a heating element) and the smooth taste very much appeals to me. This would be a great way to make coffee while camping or traveling.

Misc. Findings:

– Preferred type of coffee grounds used is a percolator-coarse ground, the better the coffee, the better the end product
– “Brewing” coffee more than 12 hours (I went as far as 22) did not alter the taste of the concentrate
– “Brewing” coffee at room temperature rendered a more bitter coffee, though some might like this more, I preferred the refrigerated version
– To strain I used a tea strainer, you can use cheesecloth or whatever strikes your fancy

If you have suggestions or tips, feel free to contact me.